
— Decompression theory —
Learn What Your Dive Computer Is Actually Telling You
Your dive computer is running a decompression model, and the central concept in that model is something called an M-value — the maximum amount of dissolved gas pressure your tissues can theoretically tolerate at any given depth without presenting symptoms of decompression sickness. It's a line on a graph, not a single number, and once you see that graph the entire logic of your computer — NDLs, ceilings, gradient factors, all of it — clicks into place. Here's how it works, what it means for your diving, and where the science is genuinely still being figured out.
Your computer has changed — has your understanding kept up?
Five or six years ago, most recreational dive computers gave you a conservatism dial with three settings — low, medium, high — and that was about it. You picked one, trusted the box, and got on with the dive. The computer was a black box by design, and honestly, that was fine for the diving most people were doing.
That's not the world we live in anymore. The current generation of dive computers — even the ones marketed squarely at recreational divers — now expose the same decompression controls that used to be reserved for technical diving.
The Shearwater Peregrine and the newer Tern, both pitched at recreational divers, run Bühlmann ZH-L16C with user-adjustable gradient factors. You get preset conservatism levels (low, medium, high), but you can also switch to custom mode and set GF Low and GF High independently — the same controls a tec diver on a Perdix 2 or Petrel 3 is using at 60 metres on trimix. Garmin's Descent line — from the watch-sized G2 right through to the Mk3 — does the same: Bühlmann with gradient factors, preset or custom, across their full range. The Suunto Ocean defaults to 45/80 gradient factors with the option to go custom, and their newest Nautic S now supports both Suunto's RGBM and Bühlmann with GFs, letting you switch between algorithms entirely. Even the Apeks DSX gives you free-entry gradient factors alongside its sport presets.
This is genuinely good — more control means you can tailor the model to your diving, your physiology, your risk tolerance. But control without understanding is just a more precise way to get it wrong. If you're adjusting gradient factors because a forum post said 30/85 is "what the tec divers use," or because your buddy or guide is running those numbers so you figure you should too, and you don't know what those numbers actually change in the decompression model, you're flying the aircraft without reading the instruments (for a nerd like me, that's a genuinely uncomfortable thought).
So — whether you're a recreational diver who's noticed these new settings and wondered what they mean, or a newer technical diver who's been told to "set your GFs" without a clear picture of what a gradient factor adjusts — this is the foundation everything else is built on.
The one chart that makes it all make sense
The concept is best explained on a pressure graph, and if you're a visual learner like me, it really can help to grasp the theory.
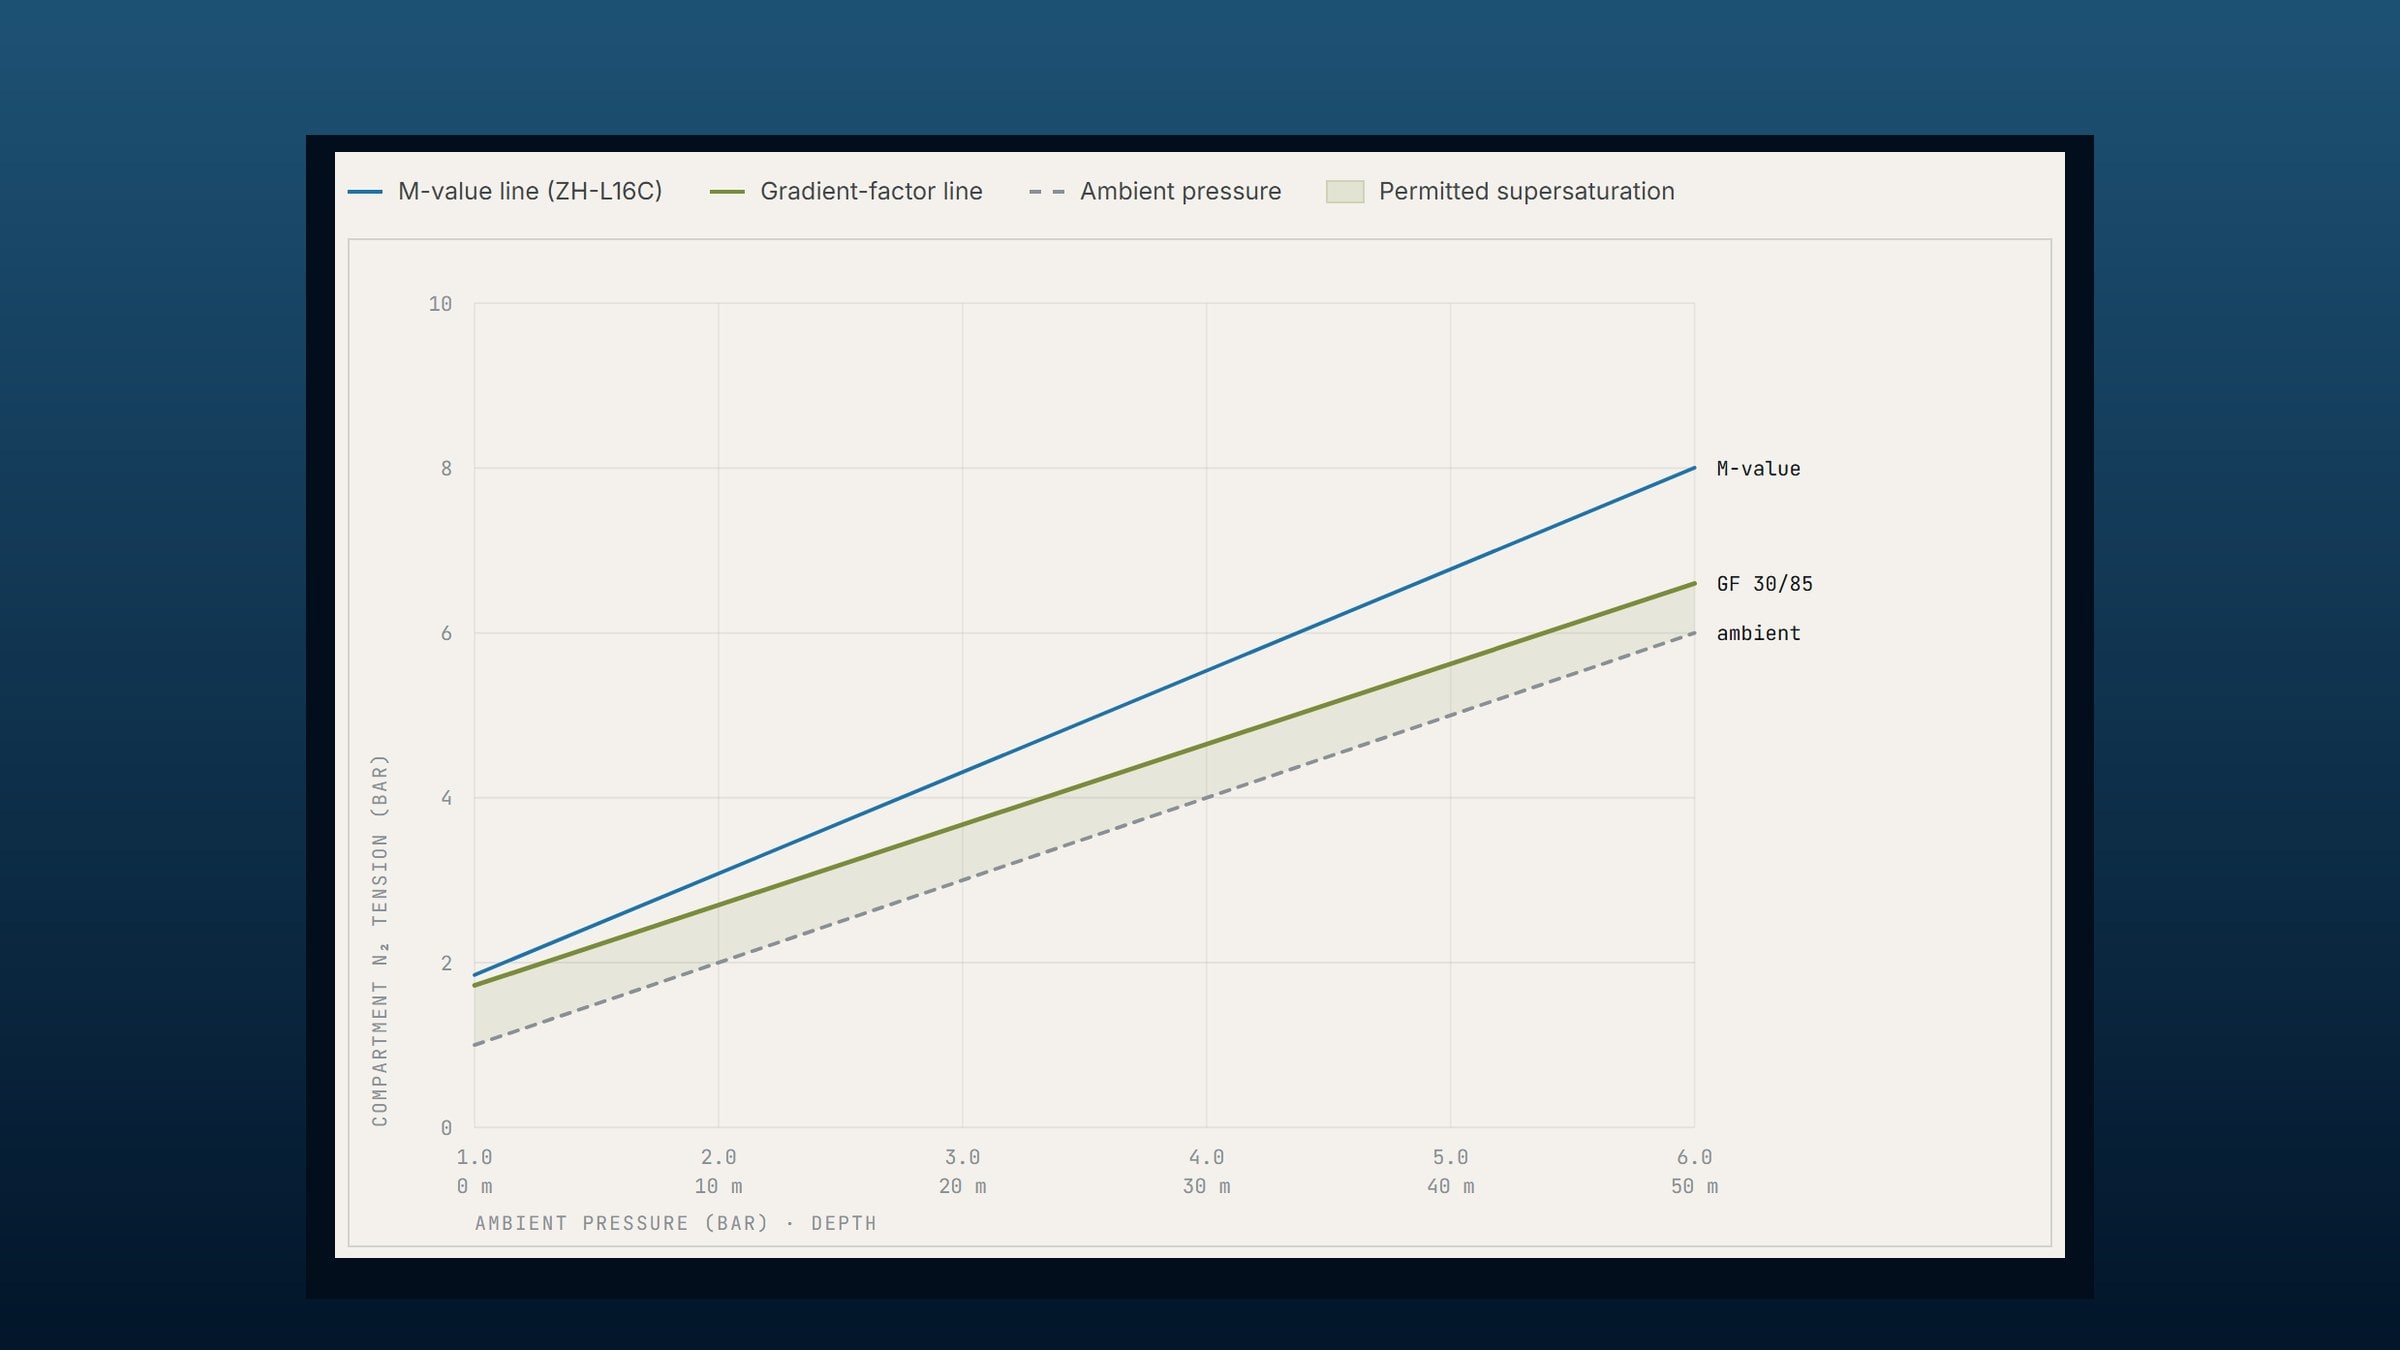
Picture two axes. The horizontal axis is ambient pressure — the pressure of the water around you, which increases with depth. The vertical axis is compartment inert gas pressure — how much nitrogen (or helium, if you're on trimix) is dissolved in a given tissue compartment inside your body.
Now draw a diagonal line from the bottom left upward at 45 degrees. This is the ambient pressure line — the point where tissue gas pressure exactly equals the water pressure around you. If you sat at any depth long enough, every tissue would eventually land on this line. That's saturation: what's dissolved in you matches what's pressing on you. No gradient, no gas movement.
The M-value line sits above the ambient pressure line. The vertical gap between the two represents the amount of supersaturation — tissue gas pressure higher than ambient pressure — that a compartment can theoretically tolerate. Cross the M-value line, and the model says you're at risk of symptomatic DCS. Stay below it, and you're within the model's limits.
Here's the part that's worth sitting with: the space between those two lines is where decompression actually happens. That region is called the decompression zone. You need supersaturation to off-gas — if tissue pressure is higher than ambient, the gradient pushes gas out of your tissues and back into your blood for transport to the lungs. If tissue pressure equals ambient, nothing moves. So decompression isn't about avoiding supersaturation entirely. It's about managing how much of it you carry, and for how long.
Play with the sliders. The green line is your actual ceiling after gradient factors are applied — a straight line from GF High at the surface to GF Low at max depth. Move GF Low down and watch it pull closer to the ambient line at depth — meaning your first stop would be deeper and your supersaturation kept very conservative early in the ascent. Move GF High down and watch it tighten at the surface — you're allowing less overpressure as you reach the shallows, which adds more shallow stop time. Set both to 100 and the green line collapses onto the M-value line — you're using the full, unmodified Bühlmann model with zero additional margin.
What your computer is doing, every second of the dive
During every second of your dive, your computer tracks inert gas loading in all 16 compartments at once. It knows the depth, the gas mix, and the time — and from those inputs it calculates, continuously, how much nitrogen has dissolved into each theoretical compartment.
At every moment, it compares each compartment's current gas loading against that compartment's M-value at the current depth. The compartment closest to its M-value — the one with the least margin left — is the leading compartment, and it dictates your ceiling.
On a no-deco recreational dive, none of your compartments ever reach their M-value line at the surface. Your NDL (no-decompression limit) is the time at which the leading compartment would touch its surfacing M-value if you ascended directly. Once that time runs out, your computer is telling you that a direct ascent is no longer within the model's limits.
One subtlety worth knowing: the leading compartment shifts during a dive. On a bounce dive to 40 metres, it's typically a mid-range compartment — say, a 20 to 60 minute half-time — that becomes controlling first. The fast compartments saturated quickly and have already started off-gassing by the time you begin your ascent. The slow compartments haven't absorbed enough gas to be anywhere near their M-values. It's the ones in the middle that drive the first stop. As you ascend and wait, the lead hands off to progressively slower ones — which is why your last few metres of deco can feel agonisingly slow.
Gradient factors — the conservatism dial on your computer
If M-values are the ceiling, gradient factors are a way of choosing not to use all of it. They were developed by Erik Baker in the late 1990s as a way to apply a conservatism margin to the Bühlmann model.
A gradient factor is simply where your tissues sit between the ambient pressure line and the M-value line, expressed as a percentage. GF 0% means zero supersaturation. GF 100% means you're using the full Bühlmann M-value with no additional margin. GF 85% sits 85% of the way from ambient to the M-value.
The two numbers on your computer — say, 30/85 — are GF Low (the conservatism at your deepest stop) and GF High (the conservatism at the surface). The computer draws a straight line between those two points, creating a more conservative ceiling that shifts as you ascend.
When the old-style computers offered you "conservative, normal, aggressive," they were doing something similar behind the scenes — just not telling you the numbers. The difference now is that you can see exactly what you're adjusting, and adjust each end independently. That's powerful — but only if you understand what the numbers mean.
Watching it happen — a dive on the pressure graph
Here's where it comes together. This animation shows a complete dive profile — descent, bottom time, ascent, and safety stop — traced on the pressure graph so you can see exactly how your tissue loading moves through the decompression zone.
Watch the phases. During descent, the tissue trace stays below the ambient pressure line — your tissues absorb gas, but they can't keep up with the increasing pressure. During bottom time, the trace climbs vertically as the tissue loads at constant depth. On ascent is where the lag really matters — ambient pressure drops quickly as you rise through the water column, but your tissues can't off-gas anywhere near that fast. The dissolved nitrogen needs time to diffuse out of the tissue, into the blood, back to the lungs, and into the gas you exhale. That process is slow, and it's why the trace crosses above the ambient line into the decompression zone. The gap between the two is your supersaturation — and it's both the driving force that pushes gas out and the thing your computer is watching to keep you safe.
The six-minute stop in the animation is simply there to illustrate what happens when your tissue loading approaches the GF ceiling — it's an easy example of a mandatory safety stop, not a prescribed number. The principle is what matters: by holding at a constant depth, you're giving your tissues time to off-gas and bring the loading back down below the GF line. That buys you the margin to continue ascending and surface safely under the ceiling you've set. Whether that stop is three minutes at 5 metres on a recreational dive or a longer hold at 6 metres on a deeper profile, the mechanism is exactly the same.
The critical moment: the tissue trace reaches the GF ceiling — the dashed line your computer is watching. That's when the computer says stop. During the six-minute hold, the trace drops vertically — the tissue off-gasses at constant depth, with ambient pressure holding steady. Once it drops enough, the final ascent brings the diver to the surface right at the 85% GF High mark — safely under the ceiling.
Without that stop, you'd surface above your chosen GF High. The stop buys the time for tissue pressure to drop below the limit you set. This is exactly why the safety stop exists, and why it matters more than most recreational divers realise.
Why this matters when you change the settings
Here's the thing that nobody puts on the settings screen: gradient factors are not a difficulty slider. They're not "beginner, intermediate, advanced." They're a specific adjustment to a specific mathematical model, and moving them in the wrong direction has real consequences.
Setting GF High to 100% doesn't make you a brave diver — it means you're surfacing with zero margin above the model's theoretical limit for symptomatic DCS. Setting GF Low to 15% doesn't automatically make you safer — it may force deep stops that allow your slow tissue compartments to absorb more gas during the additional time at depth.
On the recreational computers now offering these controls — your Peregrine, your Descent G2, your Suunto Ocean — the default presets are sensible starting points, chosen by engineers who understand the model. The "medium" conservatism on a Shearwater (40/85) or a Garmin (40/85) is a reasonable setting for the vast majority of recreational diving. If you've never thought about gradient factors before and your diving is going well, there's no urgent reason to change anything.
It's also worth being honest about context here: most recreational divers never come close to pushing their M-values. If you're doing a couple of dives to 18 metres on a holiday, your tissue loading is comfortably inside the model's limits and gradient factors are largely academic — your NDLs are long, your safety stop is precautionary, and the conservatism setting is making only a small difference to your actual profile. This is why gradient factors have traditionally been a technical diving concern — it's the divers pushing deeper, longer, and into mandatory decompression who are genuinely operating near the ceiling and need to understand exactly where it is. But even for recreational diving, there's real value in understanding how your conservatism setting works — what "medium" actually means, why a cold or strenuous dive might warrant a more conservative profile, and what your computer is doing when it shortens your NDL. You don't need to be near the ceiling to benefit from knowing where it is.
But if you are going to adjust them, know which direction is more conservative and which is less. Know that a lower GF Low creates deeper stops, and that the evidence on whether that's beneficial is genuinely unsettled. Know that a lower GF High means longer shallow stops but a wider safety margin at the surface.
The deep stops debate — honest uncertainty
For years, the dive community leaned heavily toward lower GF Low values on the logic that deeper initial stops must be safer. It felt intuitively right, and bubble models reinforced the idea.
More recently, that intuition has been challenged. Research discussed through DAN and UHMS has raised a genuine concern: sitting at a deep stop keeps the fast compartments conservatively within their limits, but the slow compartments — which weren't controlling at that depth anyway — continue absorbing gas. That additional loading in slow tissues may ultimately increase total decompression obligation and, in some profiles, DCS risk.
This doesn't mean deep stops are dangerous. It means the question is genuinely unsettled, and blanket statements in either direction outrun the evidence. Some experienced technical divers and agencies continue to use moderate GF Low values (30–40) with confidence. Others have moved toward higher values (50–70). The evidence base is still catching up with practice, which is an honest and normal state of affairs in diving science.
My take
Having laid all that out — I think M-values are one of those concepts that transform a diver's relationship with their computer. Most of us spend our early diving years treating the computer as a black box: it says 8 minutes NDL, I believe it; it says stop at 6 metres, I stop. There's nothing wrong with that — the model is doing its job.
But the moment you see the pressure graph, you understand why the computer is saying what it's saying. And with today's computers putting gradient factor controls in front of recreational divers — on a Peregrine that costs less than a decent regulator — I'd argue that understanding has become less optional than it used to be. You don't need to be a tec diver to benefit from knowing what GF High means. You just need to be a diver who'd rather understand their tools than blindly trust them.
If you want to work through gradient factors properly — understanding what the numbers mean for your specific diving and how to set them with intention rather than copying forum advice — that's the kind of thing we dig into together in the water.
Sources
- Baker EC — “Understanding M-Values,” Immersed, 1998. Freely available at frogkick.nl. The foundational paper on M-values for the sport/technical diving community.
- Workman RD — “Calculation of Decompression Schedules for Nitrogen-Oxygen and Helium-Oxygen Dives,” U.S. Navy Experimental Diving Unit, 1965. Research Report 6-65.
- Bühlmann AA — Decompression—Decompression Sickness, Springer-Verlag, 1984.
- Divers Alert Network — “Gradient Factors,” Alert Diver, 2021. dan.org.
- Powell M — Deco for Divers: Decompression Theory and Physiology, 2nd ed.
- CMAS Fact Sheet — “Gradient Factors (GF) and Dive Computers,” 2024. cmas.org. Comprehensive comparison of GF implementation across manufacturers.
- Rebreather Forum 4 Proceedings — Valletta, Malta, 2023. rebreatherforum.tech.
- Mitchell SJ, Doolette DJ — various publications on deep stop safety, cited in UHMS and DAN discussions.
- Shearwater, Garmin, Suunto, Apeks — respective user manuals for Peregrine, Tern, Perdix 2, Descent G2, Descent Mk3, Suunto Ocean, Nautic S, DSX. Referenced for GF implementation details.